(Copyright 2003 Dr E J Hammond / Dr A K McIndoe)
Software updates will be made
available from time to time at the following
website: http://www.logbook.org.uk
For further information contact us via E-mail at support@logbook.org.uk
NEW FEATURES IN VERSION 6!
TROUBLESHOOTING
INSTALLATION INSTRUCTIONS
Welcome to the PC/Mac Logbook for Anaesthetists in training. This program is distributed as 'freeware' but copyright remains with the original authors (Hammond/McIndoe). It is designed to work as an independent application on a PC running Windows 95/98/NT/XP or a Macintosh Computer OS up to version 9.2. You do not need to purchase any additional software to run the logbook. The CD-ROM released via the College tutor network contains both Mac & PC versions 1 of this program. Version 1 works fine and has no major errors. It is millennium compliant but displays dates with the two figure notation (dd/mm/yy). This version remains cross compatible with earlier versions but makes use of additional files to produce some reports. It is therefore best to install it into a separate folder and to use the import options to drag cases across from previous versions. There is no need to update other than to use some of the more recent enhancements although we would advise that all dates and DOBs entered from now onwards in either version be written as a four figure year (eg 1900, 1963, 1999, 2000, 2002 etc).
WINDOWS USERS
The logbook v.6 archive will install
version 6 of the logbook to the default directory
C:\@logbook6
IMPORTANT: Do not install to C:\@logbook or C:\@logbook2 etc. (the
default directories for versions 1, 2, 3, 4 and 5 of the logbook) or
your existing logbook will be overwritten.
1. Double click on 'setup6.EXE'.
2. Start the logbook by selecting the icon located on the 'Start' menu in 'Programs'.
Don't move any files to other locations (directories).
UPGRADING TO VERSION 6 FROM ALL OLDER VERSIONS:

WINDOWS 3.1/3.11 USERS:
You really ought to consider investing in a new computer! Otherwise you will need to install Win32s first (details from the website... or e-mail us for additional help).
Installation is simply a case of dragging the logbook folder to a convenient location on your hard drive. Alternatively, follow the link at www.logbook.org.uk. The web versions of the logbook are bound in a .sit file. You will need 'Stuffit Expander' to open them. Stuffit is an excellent freeware programme and is preloaded in Applications (Mac OS9) in (Internet - Internet Utilities - Aladdin Folder) on most Macs. Use the 'Go' - Home' command on the menu bar in OSX or Sherlock 2 facility in OS9 to find it. Alternatively it is available from www.aladdinsys.com.
Version 6 of the logbook is fully compatible with Mac OSX.
Version 4 of the logbook is more compact and is compatible with Macintosh OS 7 - OS 9.2 but you may encounter problems with OSX. If this is the case, use the classic environment from within OSX. The logbook should start this automatically. If not, this can be done manually via the 'system preferences' icon on the dock. If all else fails, temporarily change your 'start up disk' to OS9.2 via the system preferences. You can switch back to OSX as a startup disk via 'Control panels' which can be accessed through the 'Apple' menu in OS9.
UPGRADING TO VERSION 6 FROM ALL OLDER VERSIONS:
UPGRADING, BACKUPS & IMPORTING/EXPORTING CASES

CREATING A COMPRESSED BACKUP
OF LOGBOOK6.RCA
Produces a compacted file called 'Logbook backup.rca' (in the
@logbook folder). This should be kept as up to date as possible since
it forms the first line of defence in the event of a computer crash.
To restore it, rename the file 'logbook6.rca' and place it in the
logbook folder (C:\@logbook6 on the PC). It will replace the
corrupted version.
EXPORT RECORDS
TO A TEXT FILE
Produces a file called 'Export.txt' using the found set of cases
(in the @logbook folder). The default file produced is tab-separated
text with the same 21 field set and field order used in the original
SCATA Psion 3a/c/mx logbook. This is the recently agreed basic
common interchange format for College approved logbooks. We have
added 'anaesthetic 2', 'age' and 'anaesthetist' to the field list and
these will appear at the end of the list of fields. Alternatively,
this option can be used to create a very small emergency backup file
of your FileMaker logbook. Even the largest logbook should back up to
a 1.4Mb floppy in this format.
It is possible using this option
to produce backups in other file formats and to add or subtract
exported fields, but bear in mind that this may make it difficult to
exchange the data with some other logbook programmes.
UPGRADING FROM A
PREVIOUS RCA PC/MAC LOGBOOK
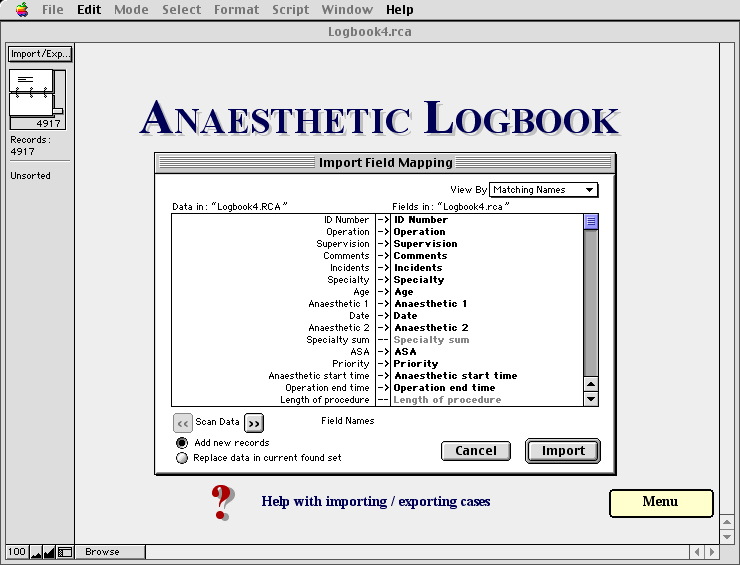
This feature assumes the field names & structures in the two
files are compatible and can be quickly aligned using the View by
'matching
names' tab (top right hand of
screen). It is the quickest way to import cases into version 6 from
versions 1,2,3 or 4 of the logbook. It also allows you to split a
large departmental logbook into a number of individual ones. Cases
can be exported from the master and then re-imported into the
offspring logbooks. A trick for those faced with a number of
exports... find the set of cases in the master logbook then close it
down without exporting them. If you now import from this closed file,
only the found set will be imported across to the new
logbook.
IMPORTING
CASES FROM A PSION 3a/c/mx
This template has been specifically designed to match the SCATA
Psion 3a/c/mx logbook. We have found it useful to set the database
choices within the Psion logbook to those that appear in this
logbook. If you don't want to use it in this way you can reset the
way the fields match by reformatting & exporting in any way you
wish. For convenience, the two Psion "User" fields appear on the
import template allowing data to be sent to other fields using the
Reformat & Export button whilst downloading them to the master
logbook. Don't forget to enter the trainee name if the logbook is to
be used as a departmental database.
Here is a step by step account of how to go about importing from the Psion... be forewarned it's awkward until you get the hang of it!
1)
SAVING A TAB-SEPARATED TEXT FILE
VERSION OF YOUR PSION LOGBOOK
Start on the Psion system screen(look for one named logbook that
appears under the files icon for databases).
1.Open "Logbook" DATABASE file on the
Psion (NOT the logbook program)
2.Press "Menu"
3.Select 'File - Save as'
4.Choose a name for the file (and add the suffix .TXT)
5.Scroll down to 'Save as' and change it to -Text- (using L & R
arrows)
6.Scroll down to 'Delimiter' and change it to -Tab-
7.Press "Enter" (the file can then be transferred from \DAT directory
to a PC or Mac using PsiWin or Mac Link)
NB THE PSION LOGBOOK DOES NOT ALLOW YOU TO EXPORT A SUBSET OF RECORDS. In order to prevent duplication of records each time you import cases, we suggest you start a fresh Psion SCATA logbook file after each download. This avoids the problem of duplication of records on subsequent downloads.
TO DO THIS rename the "Logbook" file ON THE PSION , for instance change "Logbook" to "Log1". These files can still be analysed by the Psion graphing tool LOGPLOT (Hammond/McIndoe). See end of file for details of how to load this. When you next try and run the Logbook a brand new Logbook file will be created for you automatically. Copy this tab separated text file in the Logbook directory of you computer using PsiWin (or Psion Link for Macs) with conversion option set to OFF.
2)
IMPORTING THE TAB-SEPARATED TEXT FILE INTO THE LOGBOOK
1.Open the Logbook.
2.Select the Import Cases icon.
3.Select the Import from Psion icon.
4.Select Yes if you already saved the .txt file.
5.Select the File from which to import from.
6.Follow the instructions on screen and label the records with the
trainee details accessed from the staff file. Make sure the staff
file has been filled in properly.
7.When you have checked the data in the import template file, press
the Export to Logbook button to send the cases to the master Logbook
file.
This system is set up to use the User 1 field as a field in which to
put regional information and the user 2 field for free text entry.
This will appear on the Input screen of the logbook.
IMPORTING
DATA FROM A PALM OR POCKET PC PDA TO THE RCA PC LOGBOOK
The following instructions are an abridged version of the more
detailed files on the HanDBase
Logbook website maintained by
James Berrington. Please refer to these if you require more
information:
If you own either a handheld computer running either the Palm or Pocket PC operating software you can collect your logbook data on the handheld and then transfer it to your RCA PC Logbook. For more detailed instructions on how to do this, consult the helpfile accompanying the Handheld logbook.
1. To do this you first need to purchase HanDBase (v2.75 or later), which is the database software required to run the handheld logbook. HanDBase costs about $25 and can be downloaded from www.ddhsoftware.com. Make sure you download the appropriate version for you handheld computer. Follow the installation instructions carefully. When you install HanDBase, it will install the database software to your handheld and also install a program called HandBase Desktop on to your main computer. This will allow you to open your handheld databases on your desktop computer after HotSyncing the handheld.
2. After downloading HanDBase you need to download the logbook itself which can be found accompanying this logbook or at www.logbook.org.uk. Install this onto your handheld by doubleclicking the RCA_Logbook.pdb file which will bring up a dialogue box confirming where to install this logbook file. Follow the instructions for your handheld to install the file. Once both HandBase and the RCA_Logbook.pdb file are installed on your handheld you can start collecting your data for you logbook by opening RCA_Logbook.
TRANSFERRING CASES FROM THE PDA TO THE PC
1) PERFORM A 'HOTSYNC'
When you wish to transfer the logbook data you have collected to
the PC logbook, connect up your handheld to the PC and press the
HotSync button. This will ensure that a copy of all your databases is
transferred to your PC logbook. We advise that you only use the
handheld to collect the data and so at the end of the transfer we
will wipe the handheld logbook of all its records. Experienced
database users may wish to use filters to export subsets of data and
maintain their main data on the handheld.
2) MAKE A TEXT FILE THAT CAN BE
IMPORTED
1. After you have hotsynced your handheld, open the HanDBase Desktop
application (shortcut should be on your desktop).
2. Click the second button in the menu bar, which should say "Open
existing HanDBase database" or select "OPEN" from the File Menu.
3. Double-click on the file "RCA_Logbook" to open it.
4. From the File Menu select "EXPORT…"
5. Ensure that the output format is set as "comma separated file" and
click "OK"
6. In the export dialogue box that appears ensure that the following
options are selected:
7. Select the option "Create first line with field names"
8. Select the option Export Using "FIELD order of fields"
To make it easier to find the datafile we suggest you change the output file location to your desktop and give it a logical name for future reference. You can change the destination directory (which could be either your desktop or the file in which you keep your main PC Logbook) by clicking the Browse button and navigating to your chosen directory. Change the name of the file from RCA_Logbook.csv to something like LogbookDataXX.csv where XX is any text you like that helps you identify which set of data this export refers to. You should keep these files in a safe place as they can be used to recover your logbook in the event of a major computer crash.
You should now have successfully created a datafile that the PC Logbook will read!!
3) IMPORT THE TEXT FILE INTO THE
LOGBOOK
1. Open the RCA PC Logbook.
2. Click on the Import/Export Cases button
3. Click on the Import from a PDA, database or spreadsheet button
4, Click on the Palm icon
5. In the dialogue box that appears find the logbook datafile you
created in step 2 above. You will have to change the 'Look in
directory' to either Desktop or wherever you placed the datafile.
6. Select the datafile and click open.
7. In the box that appears ensure that the field names match up and
that there is a black arrow between all of them.
8. If they don't, you may have to move one some of the fields on the
right hand window to match with those on the left. Anaesthetic 2 and
Age in years on the left will need to be matched and the black arrow
activated by clicking in the appropriate spot between the two field
names. Don't worry too much about CI1 and CI2 which are the critical
incident fields unless you collect CI data in these fields.
9. Click the Import button to import the records to the PC Logbook
template.
10. You may tag these records with Trainee details if you regularly
use the Staff database. If you don't, click the NO option.
Your cases should now be in the logbook template and is you should see that the contents of this first record match the names of the fields. If they don't it means that you did something wrong at the import stage. To start again exit the logbook completely by selecting Exit from the File menu and start Step 3 again.
4) COMPLETE THE TRANSFER TO THE PC
LOGBOOK
1. Click the Export to Logbook button to transfer these records
to your main logbook
2. In the dialogue box that appears ensure that the option in the
View By: box is set to Matching Names.
3. Click the Import button to complete the transfer into you master
logbook.
4. One final step is to delete the extra record we created with the
field name to help you through the import process. In the list on
your screen, you will see that the first record has the names of the
fields within the fields rather that your data.
5. Click the Red ">" button next to this record to open it.
6. From the Mode Menu select Delete Record to get rid of this
record.
Hey Presto - you should have successfully completed the transfer of you data from your handheld to the PC. You can analyse your data now but don't forget to complete the following 2 steps before starting to collect more data on your handheld.
5) TIDYING UP... KEEP THE TEXT
FILE AS A BACKUP
We suggest you store the exported datafile from step 2 in a
directory within your main logbook directory
6) MORE TIDYING UP... DELETE THE
RECORDS ON YOUR HANDHELD
1. Open the HandBase Desktop application you used in step 2.
2. Open the RCA_Logbook file as you did in step 2
3. From the Actions menu select the Delete Records options and select
Delete All Records followed by OK
4. Click Done and Save these changes
5. Hotsync your handheld once again to complete the process and
delete all previous records from your handheld as well as your
desktop computer.
These step by step instructions may appear complicated, but once you get the hang of importing and exporting the data from one format to another it becomes a very simple operation. As with all data transfers it is essential that you follow each step carefully and make backup copies of your master logbook files at all time.
If you have problems with transferring you data you can email us at support@logbook.org.uk.
IMPORT
CASES FROM ANOTHER PDA,
SPREADSHEET OR DATABASE
This feature assumes the field names & structures in the two
files are only vaguely compatible and therefore can't be quickly
aligned using the 'match
names' command. This is often
the only way you can get information across from a theatre system.
All versions of the logbook can handle simpler spreadsheet and
database formats eg sylk, dif, tab separated text. Version 6 can
import Excel spreadsheets. Save your source data in one of these
formats first and then use this import facility within the logbook.
You will need to line the fields up to the most appropriate match
before compleing the import process. This is a tedious process but
fortunately one that you only have to endure once because the logbook
will remember the last import order. The reporting system will handle
whatever terms you throw at it with the notable exception of the
supervision reports, which you should disregard unless you have
vetted each individual case manually. Use this process if you have
encountered problems importing from newer palmtop logbook
programmes.
PASSWORDS
These are the preloaded passwords. Each one is modifiable using the 'change password' option in the file menu - but you have to have used it to change it! If you don't use a password you can only browse the logbook without the facility to add, change or delete cases. 'User' gives the most basic level of access and denies access to the tutor screen. 'Tutor' and 'system' give higher access. If you are using the logbook on your own we recommend you change tutor to your own and stick with that. Those using this as a departmental system should retain one password for their own use (so they can't be maliciously locked out) and distribute the others for communal use. We can always regain access for you if all else fails.
MAIN
MENU
Move your mouse over the
image below. A hand will appear over each of the different features.
Clicking will then take you to more detailed information on each
feature. Whenever you return to the menu page in the logbook all your
cases will be re-collected and sorted (4916 cases listed here on the
flip card icon in the top left corner). As well as using the buttons
you can navigate round the logbook by clicking on the word 'Script'
on the top menu bar. Alternatively, click on the 'Main Menu' tab in
the top left hand corner. This help file can be accessed throughout
the logbook from the 'script' menu or by pressing 'Ctrl+9' on the PC
keyboard or 'Apple+9' on the Mac keyboard.
NB The screenshots that follow are taken from Mac logbook version
4.99 but are functionally identical to version 6

NAVIGATION
VIA THE LAYOUT TAB
Cicking on the tab labelled
'Main Menu' brings up a list of 11 other layouts within the logbook.
You can click on some of these here as an example.

NAVIGATION
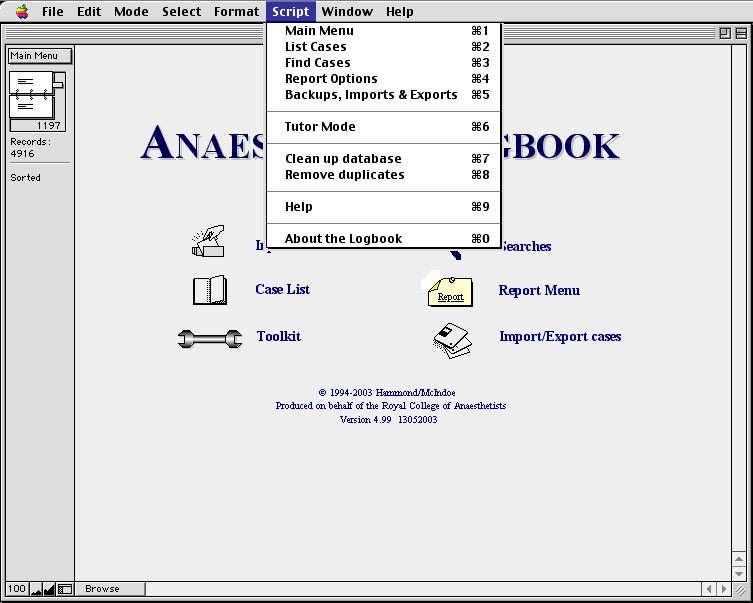
VIA THE SCRIPTS MENU
The script menu is able to
take you to any part of the logbook and to initiate a number of
useful features. This Help file is always available from the
'scripts' menu. The keyboard shortcuts for each of the 10 script menu
items are listed to the side of each function. On the PC keyboard
hold down the 'Ctrl' key and the appropriate number. On the Mac
keyboard hold down the 'Apple' key and the appropriate
number.
INPUT
CARD
New cases can be entered
directly onto the input card (click 'New record' to do this). The
date should be entered in the form dd/mm/yyyy and times as hh:mm. The
fastest way to move between the fields is by clicking on the TAB key.
Most of the fields produce picklists of College approved terms. You
can add to most of these lists by clicking on 'edit..' at the bottom
of each picklist. As your logbook evolves you can also select an
index of your favourite terms by clicking on the dark blue field
name. Clicking on the red case number (4917 below) takes you to a
list of all the cases in your logbook. The left and right arrows
allow you to scroll between each case entry (you can also do this by
clicking on the file cards (top left).

CASE
LIST
This will give you a list of all your cases sorted by date of
operation. Specialty details, ASA, age and type of anaesthetic are
also included. It can be printed on A4.
REPORTS
MENU
If you click on the report options on the main menu or the 'scripts'
menu, you will be presented with the standard report options. These
are preconfigured sort routines, but will work with whatever set of
data you have recorded within the relevant field. The reports will
only generate useful information if you enter your cases using a
standard set of terms (hence the pop-up lists), bear this in mind if
you choose to import your cases from an external database. Reports
are generated on the found set of cases. However, returning to the
main menu refinds all the cases in the logbook database - so if you
want to generate a report on just a subset you have found, go to the
report options by using the 'scripts' part of the menu bar. All the
reports may be printed, most are accompanied by a date range. They
are predefined so all you have to do is hit the button of your
choice. Retrieved critical incidents can be analysed further using
other reports options. An overall "Portfolio report" summarises the
logbook on 5 sheets of A4, including all practical procedures
performed within a specified date period. To this you can add a
'special report' on specific procedures to give, for instance, a
breakdown of supervision of central line insertion etc. Any of the
reports can be printed by selecting the yes option in the print
dialog box that appears after the report has been run. The reports
work for whatever subset of cases are held in memory at that time (in
this case 223 out of 4917 cases). See the section
below section for more
details.
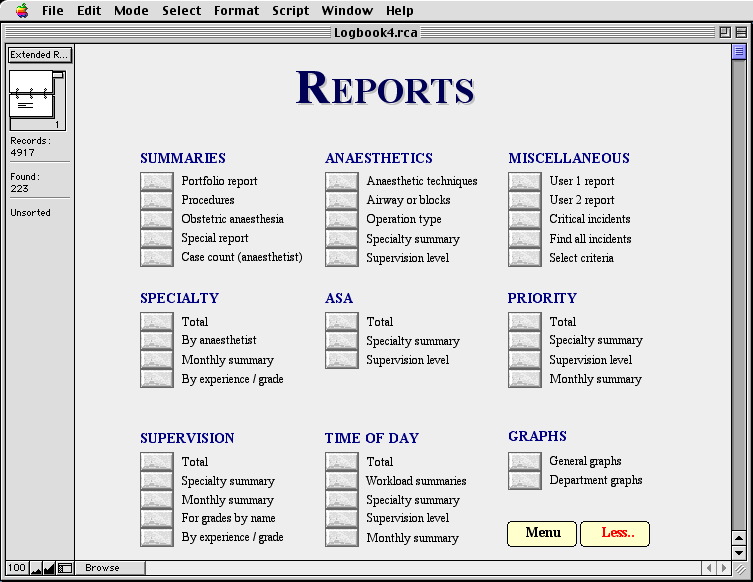
The Obstetric anaesthesia report lists all the operations conducted under the specialty 'Obstetrics' and then breaks them down by anaesthetic technique. Operation type does much the same process for a set of procedures picked by you (eg AAA or #NOF). The terms are dependent upon what you have entered into the operation field.
The graphical reports simply represent the numbers, by percentage. If you delete all the cases from your logbook you will be unable to produce graphs since the graphical element required to generate them will also have been deleted. If you inadvertantly do this, reload the logbook and import your case into the new version. See troubleshooting for more details.
The Portfolio report produces most of the tabulated information required for a RITA including a practical procedures report based on all entries made in the 3 procedures fields. The special reports option permits you to report on other things in other fields as well (eg. supervision of procedures). It allows you to choose a set of cases and to produce a College style report with your own title. It is a very powerful, but fairly complicated facility allowing you to mix and add search criteria to find a mixed bag of cases that can then be reported on.
Searches can be simple or multiple. Use the AND or OR buttons in the following way:
"All ASA 1 cases that were
emergencies"
Enter both these values on the same screen using the AND
button.
"All cases that were ASA 1 or ASA
2"
Use the OR button to enter these separately as different requests.
The results will be grouped together.
You can use both options together. Use a single find screen to match as many criteria as you wish to for individual cases (AND) and then use the (OR) option to create another set of criteria to match.
This approach can also be applied to
terms that may appear in different fields:
For instance: "I want to locate all my CVP lines"
Each of the procedure fields are separate, therefore to find all cases where an arterial line may have been sited you need to search all 3 of them at the same time. Start by entering 'CVP' in the 1st Procedures box. Then click the OR button and enter 'CVP' in the 2nd Procedures box. Then click the OR button and enter 'CVP' in the 3rd Procedures box. The search is then ready to run.
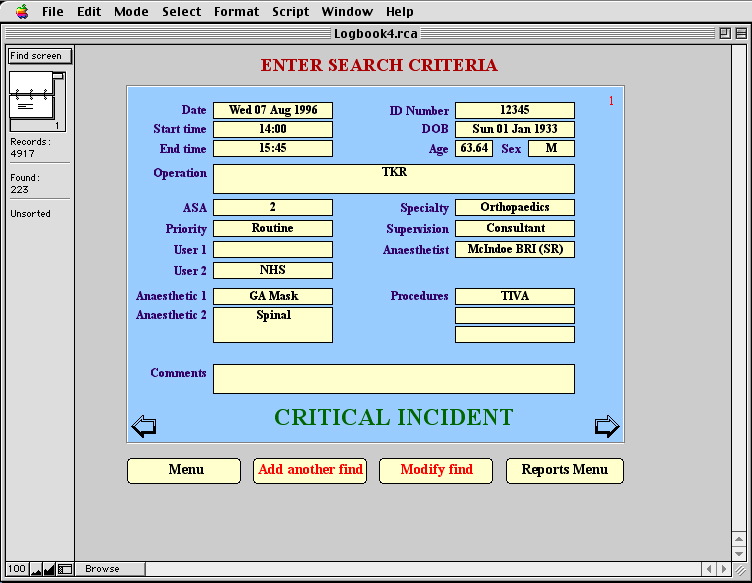
HOT TIP: The terms you have used in each field can be brought up as a picklist by clicking on the title to the left of each box (see below).
(REMEMBER! CVP won't ever be listed in Procedures1 AND Procedures2 AND Procedures3 for the same case!!)
SEARCHES
The logbook uses a system of free searches linked to
pre-configured reports. This makes it enormously flexible. Once you
have entered a number of cases, try a few searches. These can be
accessed from the main menu button or the 'scripts' menu. You will be
presented with an empty case screen. If you click on one of the blank
fields, a picklist will appear. Select a term you wish to search the
database for and then either click on 'find' or press 'enter'. This
is a search in its simplest form. All the case entries which contain
the term you requested, in that field, will be found. The number of
records found can be seen in the top left hand corner of the screen.
Clicking on the forward and back arrows allows you to scroll through
them. Alternatively, you can list them by clicking on the red number
on the top right hand of the case record. Clicking on the red arrow
to the left of a case in the list returns you to that case card. Try
clicking on the field names for an index of the terms you have used
in your logbook. The set of matching cases can also be viewed in list
form by selecting List Cases from the scripts menu. Alternatively you
may generate any number of reports on this subset by going to the
Reports
Menu. More sophisticated
search routines (combinations, exclusions etc.) are detailed
below.

But what about more sophisticated searches? Logical terms can be introduced. Use the 'Symbols' button on the left of the search screen to introduce > < etc. Date ranges need to be entered in the form dd/mm/yyyy...dd/mm/yyyy. If you want to search for terms that ACTUALLY appear within the field rather than the standard picklist terms, click on the field NAME to the left of the field itself. An index of the terms you have used will be displayed. This is particularly useful for picking up spelling mistakes etc that have slipped through.
If you don't like the search request you just made, click on 'modify find' and everything will be reset.
You can combine searches in two ways before you hit the find button. Eg
"All ASA 1 cases that were
emergencies"
Enter both these values on the same screen
"All cases that were ASA 1 or ASA
2"
Use the 'Add another find' button to enter these separately as
different requests before you click on find. The results will be
grouped together.
This approach can also be applied to
terms that may appear in different fields:
For instance: "I want to locate all my arterial lines"
Each of the procedure fields are separate, therefore to find all cases where an arterial line may have been sited you need to search all 3 of them at the same time. Start by entering 'arterial line' in the 1st Procedures box. Then click the OR button and enter 'arterial line' in the 2nd Procedures box. Then click the OR button and enter 'arterial line' in the 3rd Procedures box. The search is then ready to run.
The tutor mode option allows searches to be made in conjunction with the staff database, but essentially works in the same way. The results of finds are held by the computer memory until you return to the main menu screen. They can be exported (see import/export options) or used to generate specific reports (see reports). To access these options without losing the cases go to the 'scripts' menu.
TUTOR
MODE
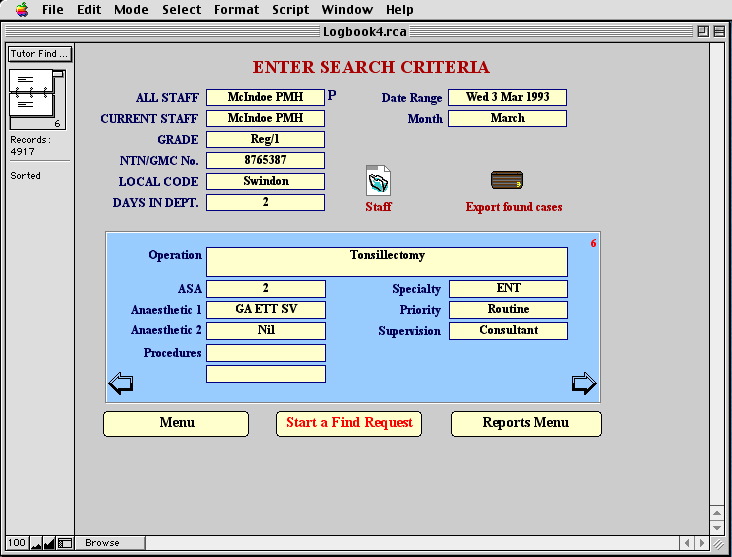
This screen picks up data by cross-reference to the "Staff"
database. It allows the tutor
to search for cases by grade, trainee, and period of time spent in
the department. Again, reports are generated on the found subset of
cases. To access the tutor find screen which allows further access to
reports by reference to individuals, select Tutor Mode from the
scripts menu.

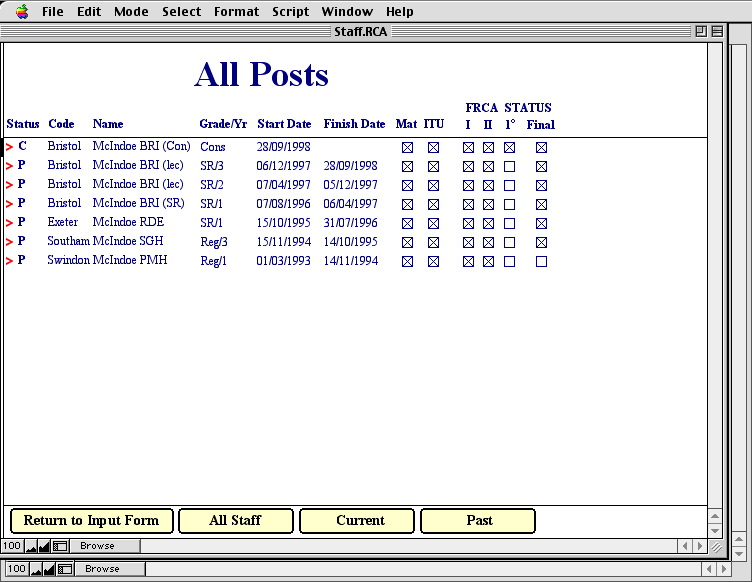
STAFF
If the logbook is to be used as a Departmental Database, each
trainee's details should be entered into the Staff file. This data is
then added to case records as they are uploaded from the PDA.
Automatic entry of data from this file into the logbook depends upon
the ANAESTHETIST NAME matching in both the logbook and the Staff
database. The anaesthetist name would normally be tagged to files
during the import process, but can be altered at any stage using the
"replace" command. Beware that if you use this feature the contents
of the particular field highlighted will be altered for ALL the
found set of cases.
If you are using direct entry to input your cases rather than a
Psion, ensure that you enter a name onto each record in the field
labelled ANAESTHETIST. Typing in the name will update all the other
trainee details. Individuals using the logbook should consider using
the Staff Database to differentiate between grades and hospitals. It
works well if ANAESTHETIST NAME has a hospital code added to it, for
example "McIndoe SGH". Each record is then tagged with contemporary
details of grade etc. Don't forget to modify the trainee name if
records are then uploaded into a departmental system.
If properly filled in the Staff database automatically calculates
whether a trainee is currently in the department or a past member.
You will see a P or C appearing next to his or her name both in the
staff database and in the logbook. It is essential that you fill in
the finish date in the department for this to work properly. If there
is no finish date entered it is assumed that the person is still in
the department. This system works well in the logbook and in tutor
mode allows the user to find trainees currently in the department or
ones who have left.
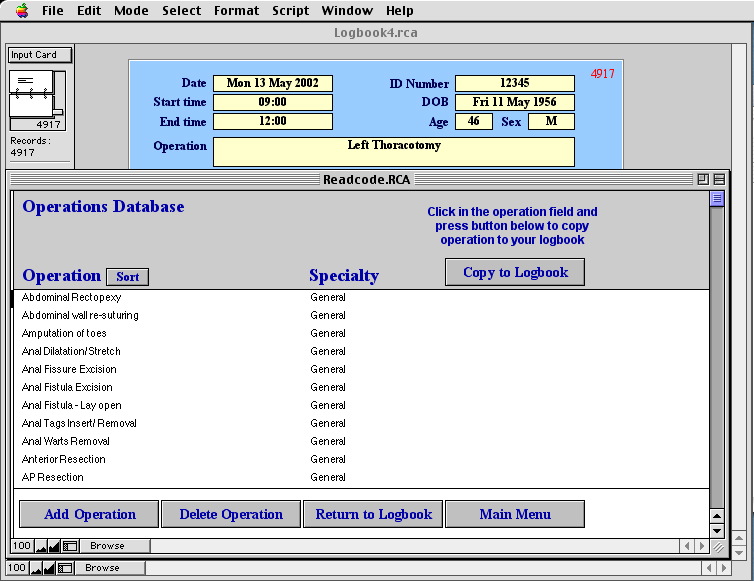
READCODE
This database should be opened from within the logbook using the
"Operation" hot-text button. At the moment it houses a comprehensive
list of some 1000 standard operation terms with a numerical coding
system. We will ultimately try to marry it up with a nationally
agreed system if and when adopted.
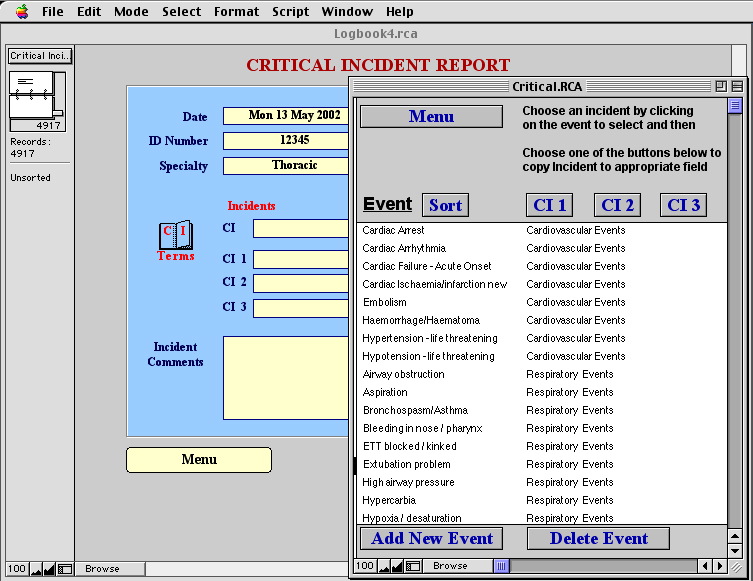
CRITICAL
Yet another database that again should only be opened from within
the logbook. This one houses the standard critical incident terms
agreed by the SCATA working group and is accessed from the critical
incident page using the "CI terms" icon. Up to three incidents may be
entered per case.
Ed Hammond & Andrew McIndoe
May 2003